Tattooed Sailor Cookie Explosion Cake


About the bake
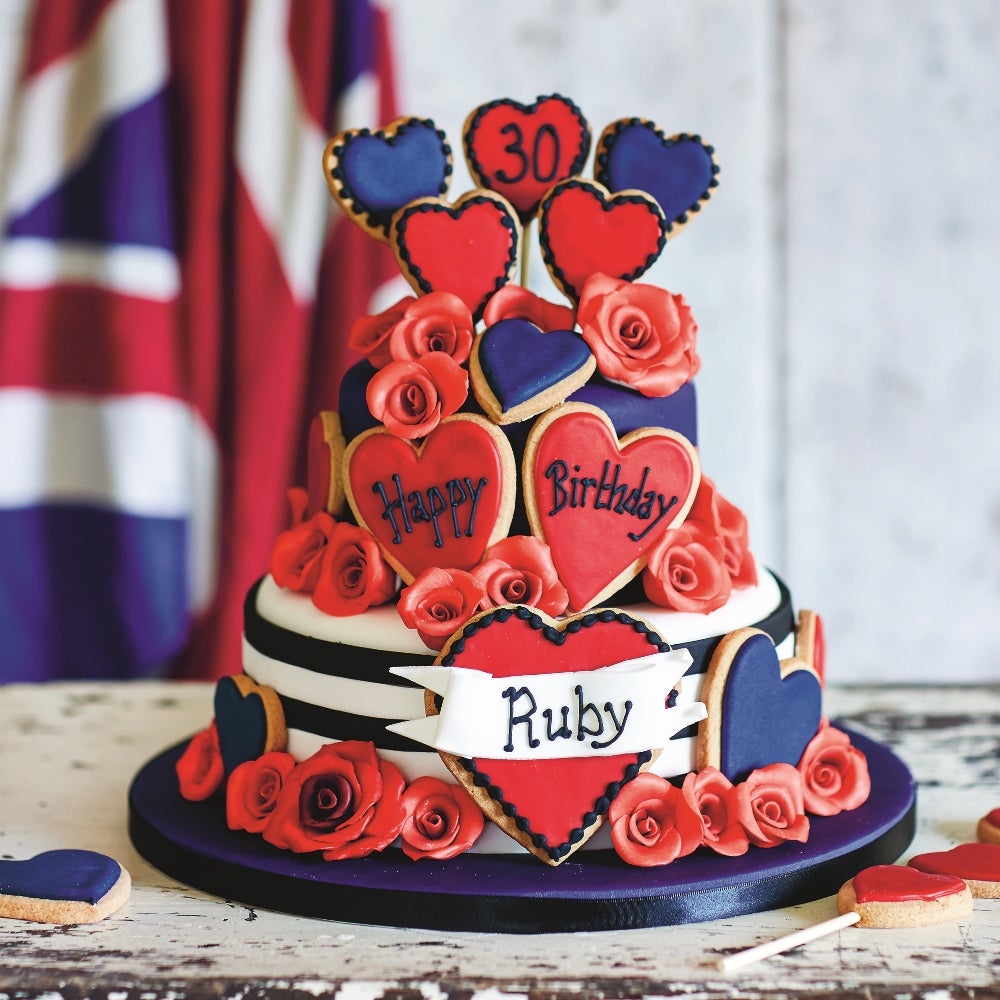
This tattooed sailor cookie explosion cake is the ideal showstopper for any celebration with a delicious combination of cookies and cake. Recipe taken from Cakeology: Over 20 Sensational Step-by-Step Cake Decorating Projects by Juliet Sear, £20.00 hardback (Hardie Grant) Photograph © Helen Cathcart.
Ingredients
For the soaking syrup (9" cake)
- 200gBillington's Unrefined Golden Caster Sugar
- 200gWater (just boiled)
- 4 tspVanilla bean paste
For the 9" vanilla bean sponge
- 400gButter (salted)
- 400gBillington's Unrefined Golden Caster Sugar
- 2 tspNielsen-Massey Vanilla Extract
- 8Egg(s) (free range) (medium, lightly beaten)
- 4 tbspSour cream
- 400gAllinson's Self Raising Flour
For the soaking syrup (6" cake)
- 100gBillington's Unrefined Golden Caster Sugar
- 100gWater (just boiled)
- 2 tspVanilla bean paste
For the 6" vanilla bean sponge
- 200gButter (salted) (softened)
- 200gBillington's Unrefined Golden Caster Sugar
- 1 tspNielsen-Massey Vanilla Extract
- 4Egg(s) (free range) (medium, lightly beaten)
- 2 tbspSour cream
- 200gAllinson's Self Raising Flour
For the buttercream
- 900gSilver Spoon Icing sugar
- 450gUnsalted Butter (softened)
- 2 tspNielsen-Massey Vanilla Extract
For the cake decoration
- 2kgBlue sugar paste icing (navy)
- 2kgWhite sugar paste icing
For the cookies
- 200gButter (salted)
- 200gBillington's Unrefined Golden Caster Sugar
- 2 tspVanilla bean paste
- 1Egg(s) (free range) (lightly beaten)
- 400gAllinson's Plain White Flour
For the cookie decoration
- 500gRoyal icing sugar
- Pink food colouring
- Blue food colouring (navy)
For the roses
- 400gModelling chocolate (bright red and dull red)
- 50gFlower paste icing
- Black sugar paste icing
- Icing sugar (for dusting)
Method
Step 1
For this recipe you will need a plastic document wallet, paintbrush, cake smoother, length of 1.5 cm (½ in) wide black ribbon, 12" cake drum, cake dowels and lollipop sticks.
Step 2
To make the cakes, preheat the oven to 180°C (350°F/Gas 4) and line a 9" and 6" cake tin.
Step 3
To make the syrup, pop the sugar in a heatproof bowl or pan. Pour the water over the sugar. Place in the microwave for 1 minute at a time, stirring frequently, until the sugar has dissolved. Or, on the hob, stir gently over a low heat (do not boil) until all the sugar has dissolved and you have a syrupy liquid. Leave to cool for a few minutes then add the vanilla pod or paste and set aside to infuse.
Step 4
To make the sponge, place the butter, sugar, vanilla extract into a mixing bowl and beat until the mixture is very pale, soft and fluffy, and the granules of sugar have disappeared. Add the beaten eggs, a quarter at a time. Mix in each addition until thoroughly combined, then gradually fold in the sour cream.
Step 5
Add the flour gradually, mixing it in gently. Take care not to over-mix or beat too vigorously. Spoon the mixture into the prepared tins. Bake for 20 minutes (6" cake) and 30-35 minutes (9" cake). The cake(s) should be a light golden brown, springy to the touch and a sharp knife or metal skewer inserted into the middle of the cake(s) should come out clean.
Step 6
Once baked, transfer the cake(s) to a wire cooling rack. While still warm, brush the top of the cake(s) with a little of the vanilla or flavoured syrup using a silicone pastry brush, and brush the bottoms (removing the baking parchment first), then spear the top(s) in several places and brush or drizzle with syrup so the syrup can soak into the sponge. Leave the cakes to cool before decorating.
Step 7
Whilst the cakes are cooling, make the buttercream by beating together the icing sugar, butter and vanilla extract. Once fully cooled fill the cakes and crumb coat the outsides with the buttercream.
Step 8
Cover the 9" cake with white sugar paste icing and the 6" cake with navy sugar paste icing. You will also need to cover a 12" round cake drum with navy sugar paste icing as your base, before stacking your cakes using cake dowels.
Step 9
For the cookies, preheat the oven to 180C (160C, gas mark 4) and line two baking sheets with baking parchment.
Step 10
Place the butter and sugar along with the vanilla bean paste into a mixing bowl and mix until just combined. Add the egg a little at a time, on a slow speed, until fully incorporated.
Step 11
Add the flour to the mixture and mix until a dough forms. Then dust the work surface with flour and roll out the cookie dough. Cut out the shapes with your chosen cookie cutter and place onto the baking sheet. Push lollipop sticks carefully through the middle, about half way up the shape then bake for 10-12 until golden.
Step 12
Leave the cookies to cool, then ice using coloured royal icing, flooding the biscuits.
Step 13
To create the roses; cut open the document wallet along the outer edge and bottom so that you can open it up like a book. Roll out some of the dull red and bright red modelling chocolate into two sausages, about 1.5 cm (¾ in) thick. Cut the sausages into 1 cm (½ in) chunks with a small, sharp knife.
Step 14
Lay the document wallet open on the work surface and line up the chocolate chunks in rows on one side of the open wallet (this prevents pieces sticking to your hands or the work surface). Make about 4–5 rows of four pieces across, leaving space between each one.
Step 15
Close the wallet over the chocolate chunks and, with the base of your thumb (just above your wrist), push down on each chunk to flatten it out. Gently run the tip of your thumb along the petal edge nearest the seam, to thin it out (don’t make it too thin – all you need is to pinch off the very edge). Repeat with all the petals.
Step 16
Carefully peel off the top of the wallet and pick up one darker red petal by its fat base. You will notice that as you lift it from the wallet, it naturally curls one way. Make sure that the curved edge is facing towards you as you work with it. For the centre of the rose, gently tuck in the petal at one
edge and roll into a tight cone.Step 17
Now take a second dark red petal off the wallet, making sure it’s curling away from the rose’s centre and attach it to the first central petal, making sure that the second petal is a couple of millimetres higher than the first one. This will ensure that the middle part doesn’t stick up above the outer petals (what we in the biz call ‘trumpeting’). Wrap petal number two around the first one, gently pressing your fingers on the base to attach it. Only handle the fat base of the petal – the top thin part is easily damaged.
Step 18
Continue adding further petals, this time in the brighter red, in the same manner: overlapping the previous petal and making sure each petal you add is a little higher up than the previous one, until you have a uniform circular rose (you’ll probably need 6–8 petals per flower). You can make them different sizes: three petals will give you a rose bud, more petals (up to 12) create a larger, open rose.
Step 19
Gently pinch each petal at the edge to create a little movement. This adds a delicate touch and makes the flowers look more real. Roll the base of the flower between your fingers to make sure it’s completely stuck and, using a sharp knife, gently cut away the excess chocolate (this can be wrapped and re-used) to make the rose flat at the base.
Step 20
Roll out the flower paste to create a scroll for the name on your cookie. Roll it fairly thinly (about 2 mm) and cut a 4 cm- (1½ in-) wide strip with a ribbon cutter or knife. Using a sharp knife, cut a ‘V’ shape at either end to create a ribbon effect. Dab or pipe a little white royal icing on the cookie where you wish to place the scroll. Pick up the scroll and bend it at one end to create a wave at the end on one side, tucking under some of the length. Press down at the point where you want to loop the scroll back across the cookie, and finish off the other side in the same way. Leave it to set for a few hours (or make it a few days in advance). Pipe your name or message over it once it has set.
Step 21
Make stripes for the base cake by rolling out the black and white sugarpaste to guide-stick thickness and cutting long strips to wrap around the cake (for the 23 cm/9 in round base cake you’ll need each strip to be about 90 cm/35 in long). Always roll sugarpaste strips out a little longer than you need, so that you get a neat join at the back. Measure the height of your base cake to work out where you want the stripes to finish (just below the top where the cake’s edge begins to curve) and divide this by six. (For mine, 9 cm/3½ in depth meant that I needed six strips, each 1.5 cm/¾ in thick.) Use a ribbon cutter or a strip of card and a sharp knife to make strips, cutting six strips in total (three black, three white).
Step 22
Place your two-tiered cake on the turntable. Brush a little water around the bottom of the base tier, running along the edge of the cake board. Roll one of the lengths of sugarpaste up onto the rolling pin and place the coiled piece of sugarpaste up against the cake, resting on the iced board. Starting at the back, unroll the strip of sugarpaste and press it gently onto the cake. Go over the sugarpaste with a cake smoother. Take a sharp knife and cut over both ends to create a neat join at the back. Repeat this process with a black stripe, wrapping it around the cake directly above the white one and continue until the cake is covered in stripes.
Step 23
Cover the bottom of the top tier, where it meets the base tier, with a length of black ribbon to hide the join, securing the ribbon with a dab of royal icing
Step 24
Finally, add your cookie decorations, placing them where you like, making sure your message or name is at the front. Use stiff white royal icing to attach the cookies.
0 Baker Ratings

We'd love a slice of advice.
Was it yum? Did the recipe work well? Did you customise the recipe?