Christening cake
2 Reviews


About our Christening Cake recipe
This Christening cake recipe will suit almost any occasion, simply change the names and colours to suit the recipient. Stick to just two or three colours to keep the style elegant.
For more cake recipes suitable for christenings, try our lemon drizzle cake or Victoria sponge cake.
Ingredients
For the 9" cake
- 150gButter (unsalted) (room temperature)
- 200gBillington's Unrefined Golden Caster Sugar
- 1 tspNielsen-Massey Vanilla Extract
- 3Egg(s) (free range)
- 75gAllinson's Self Raising Flour
- 150gAllinson's Self Raising Flour
- 1 tspBaking powder
- 3 tbspWater (hot)
For the 9" cake buttercream
- 300gButter (unsalted) (softened)
- 750gSilver Spoon Icing sugar
For the 12" cake
- 450gButter (unsalted) (softened)
- 600gBillington's Unrefined Golden Caster Sugar
- 3 tspNielsen-Massey Vanilla Extract
- 9Egg(s) (free range)
- 225gAllinson's Self Raising Flour
- 450gAllinson's Self Raising Flour
- 4 tspBaking powder
- 9 tbspWater (hot)
For the 12" cake buttercream
- 900gButter (unsalted) (softened)
- 2.25kgSilver Spoon Icing sugar
To decorate
- 2.1kgSugar paste icing (white)
- 2.5kgSugar paste icing (yellow)
- 250gRoyal icing sugar
Method
Step 1
Grease and line your cake tin with baking parchment and pre heat your oven to 150°C (130°C fan, gas mark 5).
Step 2
Make both the 9" cake and 12" cake separately and follow this method. Beat the butter and the sugar until it is light and fluffy. Add the vanilla extract and mix again. In another bowl measure the flours and baking powder.
Step 3
Whisk all the eggs and gradually beat into the sugar and butter mixture. Add a tablespoon of flour at a time to prevent the mixture from curdling, fold in the remaining flour with the water until smooth.
Step 4
Spread the mixture in the cake tin and bake for 45 minutes for the 9" cake and 1 hr 30 for the 12" cake. Check to see if the cake is done by pressing a finger gently on the top. If it bounces back it is ready, if not it will leave an indent and needs a little longer. Leave cakes to cool for 30 minute in the cake tin then turn out and allow to cool completely.
Step 5
To decorate, start by icing the cake board and leave it to dry. The board should be dampened, but not too wet to stick the icing in place on the board.
Step 6
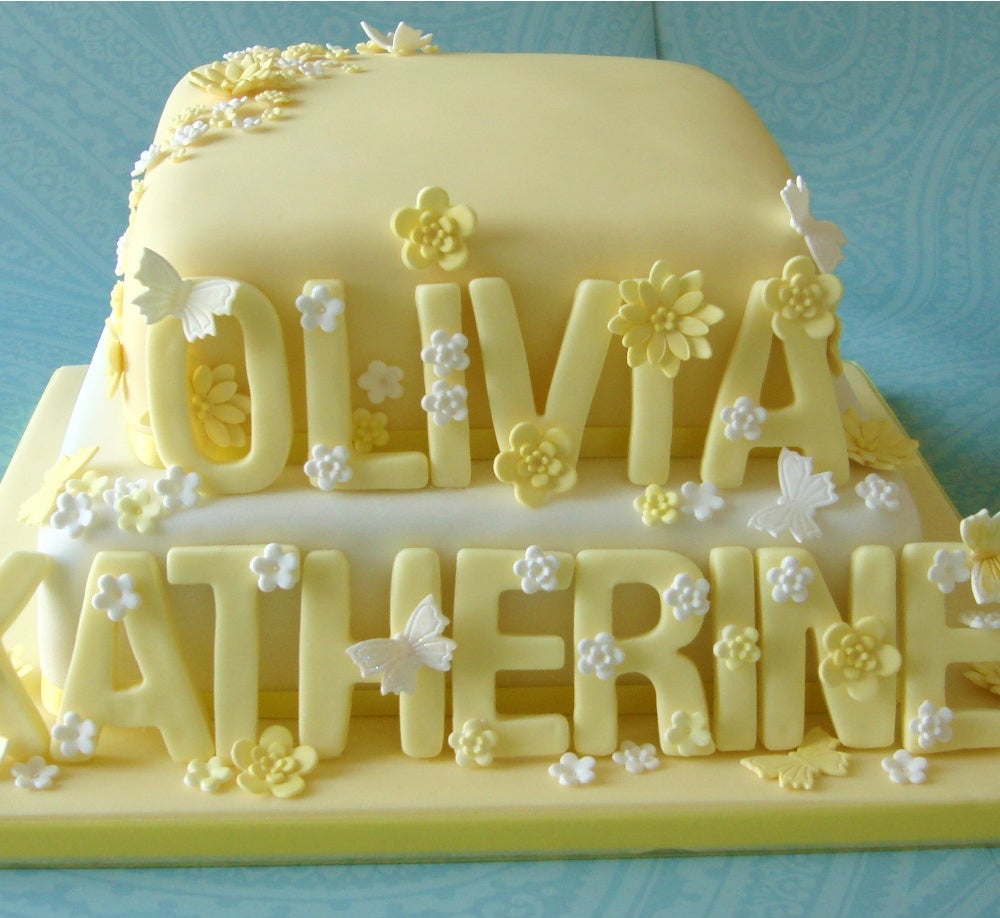
To make the name roll out some sugar paste icing . If possible, use spacers to ensure that each letter is the same thickness. Use letter cutters to cut out the name. Ensure each one has no fraying icing at the bottom. If it does use a soft bristled brush to tuck them under. Place each finished letter on a flat board and leave to dry. The letters need to be thick enough so that they will stand up without breaking and so they can withstand quite a bit of handling. These letters are 0.5cm thick and took a week to dry. Once you have made the letters turn them over every few days so that the underneath gets a chance to dry out too.
Step 7
Make the flowers using sugar paste icing, cutting out the flowers with small blossom plunger cutters and small daisy cutters. Dust each well and place each flower inside an empty egg carton to shape. Use the plunge action when making the flower so that the petals rise up and stay shaped well. Use a tiny blossom flower for the centre of each flower,
securing it in place with a small amount of clear alcohol. It is a good idea to make more flowers than you will need to allow for breakages and leave to dry so that they can be handled easily.Step 8
Make the butterflies using a plunger cutter and be sure to press down when releasing it so that you get a full pattern detail on the wings. Use a small pallet knife to lift the butterfly and position it in an empty egg carton so that one wing is flat and the other is raised up, as if it is flying. Continue making more butterflies, they look best if they are made from very thin icing sugar, so they do become very fragile. Leave them to dry so that you can handle them more easily, 3-4 days drying time is perfect.
Step 9
Make up the royal icing as directed on the packet and keep in an airtight container. Beat softened butter with sifted icing sugar, until light and creamy to create your buttercream, adding 1 tsp hot water if necessary. Store in an airtight container.
Step 10
Once the cake board, name, flowers and butterflies are dry you can assemble the cakes. Cover each cake in turn with a smooth layer of buttercream.
Step 11
To ice the cakes knead the icing till it is soft and malleable then roll it out so that it is large enough to cover the whole cake including the sides. It should be around 5mm thick, so that is won't tear as you lift it and smooth it over the corners. The 12" cake will sit centrally on the iced cake board. The 9" cake should be secured onto the 9i" un-iced cake board with royal icing before it is covered with the sugar paste icing. The 9" cake and the board will be covered in one go so you can't see the board.
Step 12
When ready, carefully lift the icing on top of the cake.Smooth it down with your hand so that the icing sticks to the side of the cake. Remove any excess icing from the bottom of the cake with a pizza cutter and smooth the sides.
Step 13
To stack the cakes, use a small amount of royal icing to position the large cake centrally on the large iced cake board. Place 4 plastic dowels in the centre of the cake, so they are spaced apart within the 9" square where to smaller cake will sit. Ensure that the dowels go all the way into the cake vertically and cut off any dowel that protrudes from the cake. Place a small amount of icing centrally on top of the 12" cake and secure the 9" cake in place.
Step 14
Once stacked, position the name where you want it to go. Don't stick the letters down until you have checked where each one goes so you know that you won't run out of space. Use royal icing to secure each letter on the cake. Apply some to the bottom of the letter and some behind the top, then lean the letter against the cake making sure that the royal icing will keep the letter stuck down.
Step 15
Once all the letters are in place, use a piping bag of royal icing to secure the flowers and butterflies in place. Put some flowers on the letters, some on the cake and some on the cake board.
Step 16
To complete the look position a matching coloured ribbon around the cake board. Secure with stick glue for instant adhesion. Use a pearl pin to keep the ends in place at the back and you're finished